Red Hat has introduced support for autofs5 in RHEL4. The default version of autofs in RHEL4 is autofs4 which has a lot of limitations. The biggest limitation of autofs4 is that doesn't have support for direct mounts. With the introduction of autofs5 in RHEL4, one can achieve all the features of autofs5 in RHEL4.
I wanted to run the autofs configuration that I explained here with ldap support which includes examples for both direct and indirect mounts in RHEL4 and below are the steps that I followed.
- The minimum update level to support autofs5 in RHEL4 is U7. The kernel version required is 2.6.9-78 and above. So I updated my system to RHEL4 U7 and the kernel running is 2.6.9-78.0.13.EL
- Install "autofs5" rpm.
up2date autofs5 or rpm -ivh autofs5-blah-blah.rpm
- It's best to turn off autofs v4 while using v5 to avoid conflict. Autofs5 supports everything in autofs4 and there is no need to run both of them at the same time.
chkconfig autofs off
service autofs stop
- Edit /etc/sysconfig/autofs5 and uncomment the schema definitions that you are following in your network. I uncommented the below lines to follow schema III that I explained here
- Edit /etc/auto.master and add the below line into it.
+auto.master
This step is very important as the default rhel4 /etc/auto.master does not include this line unlike RHEL5. So if you forget this step, maps will not be read from LDAP.
- Start "autofs5" service.
chkconfig autofs5 on
service autofs5 start
It should work just like in RHEL5.
Saturday, February 28, 2009
How to install a fully virtualized RHEL5 guest (ia64) in xen using virt-manager?
This doc can be followed to install any fully virtualized guest, but I am concentrating specifically how to install an RHEL5 ia64 fully virtualized guest on top of an RHEL5 dom0 using virt-manager.
Before starting the installation, please make sure that you are following a working combination of Dom0 + guest. See details here
1 - Launch virt-manager and click "New".
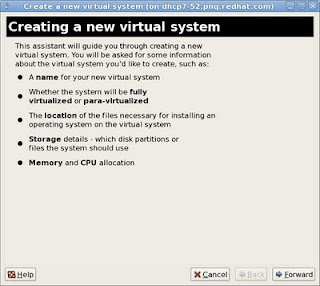
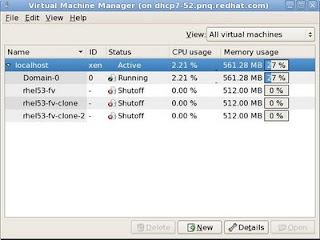 2 - Click "Forward" In the next window.
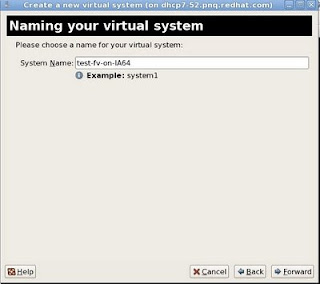
3 - In the "Naming your virtual system" window, Enter a name in the "System Name Column". Click "Forward".
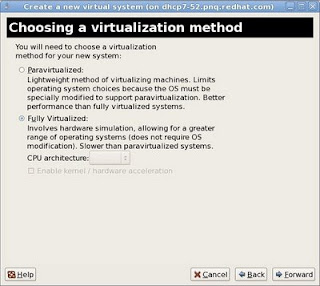
4 - In the "Choosing a Virtualization Method" window, Select "Fully Virtualized". Click "Forward".
5 - In the "Locating Installation Media" windows, Select your option appropriately. If you have a DVD iso downloaded in dom0, select "ISO Image Location" and browse the iso from the location. If you have a CD or DVD media, insert it in the drive and Select "CD-ROM or DVD" and select path to "Install Media appropirately". Click "Forward".
Select "OS Type and OS Variant" appropriately.
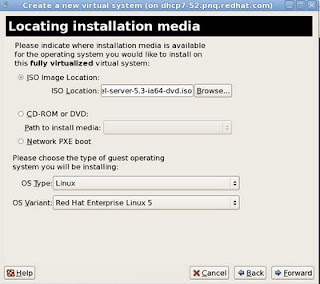
Note: If you have SElinux enabled in dom0, please make sure that the iso is kept under /var/lib/xen/images. Selinux may prevent xend from loading iso from other locations which would endup in guest creation failure.
6 - On the "Assigning Storage space" window, either point an empty partition or lvm block device in the "Normal Disk Partition" section or slect "Simple File" and point to the file location. File would be automatically created. Click "Forward"
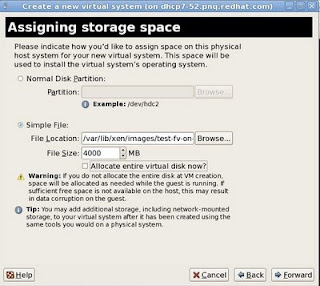
Note: If you have SElinux enabled in dom0, please make sure that the image is kept under /var/lib/xen/images. Selinux may prevent xend from writing to images on other locations which would endup in guest creation failure.
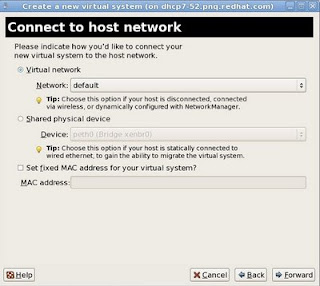
7 - In the "Connect to Host network" section, select either the "Virtual Network" or "Share physical device". Set fixed Mac address if desired. Click "Forward".
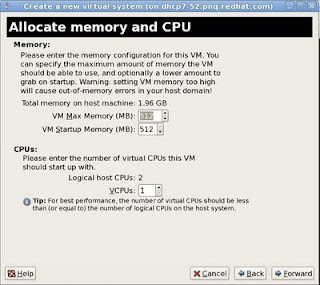
8 - In the "Allocate memory and cpu" page, select a minimum of 512MB of memory and vcpu = physical cpu on the host for optimum performance. Click "Forward".
9 - Review the summary screen and click "Finish".
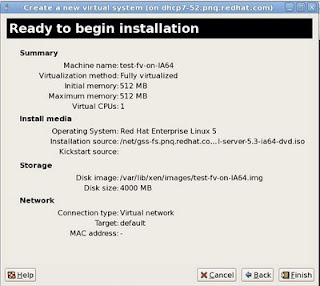
If you are installing a x86 or x86_64 guest, a graphical vnc window will pop up starting the installation of the guest and installation of the guest can be continued normally as per the installation documentation of the OS that you are trying to install.
If you are installing an ia64 guest, the installer would drop you to an EFI shell. Below steps demonstrates how to proceed with the installation from the efi shell.
10 - Efi shell would be shown somewhat similar to the below image.
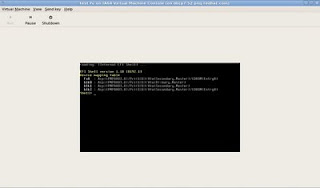
11 - On the shell, type "mount fs0" to have the DVD iso that we specified in the virt-manager mounted.
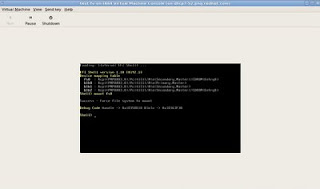
12 - Change to fs0 by typing "fs0:" and see the contents by running "dir" command.
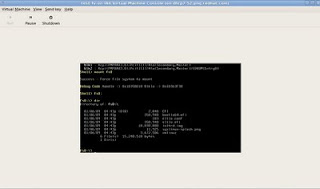
13 - boot the installation using the bootia64.efi.
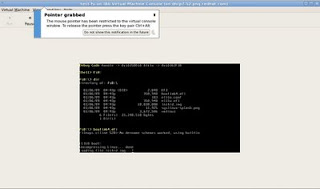
14 - Press "Enter" on the "Elilo boot:" prompt. From this point onwards, the installation of the guest would start normally.
Before starting the installation, please make sure that you are following a working combination of Dom0 + guest. See details here
1 - Launch virt-manager and click "New".
 2 - Click "Forward" In the next window.
3 - In the "Naming your virtual system" window, Enter a name in the "System Name Column". Click "Forward".

4 - In the "Choosing a Virtualization Method" window, Select "Fully Virtualized". Click "Forward".

5 - In the "Locating Installation Media" windows, Select your option appropriately. If you have a DVD iso downloaded in dom0, select "ISO Image Location" and browse the iso from the location. If you have a CD or DVD media, insert it in the drive and Select "CD-ROM or DVD" and select path to "Install Media appropirately". Click "Forward".
Select "OS Type and OS Variant" appropriately.

Note: If you have SElinux enabled in dom0, please make sure that the iso is kept under /var/lib/xen/images. Selinux may prevent xend from loading iso from other locations which would endup in guest creation failure.
6 - On the "Assigning Storage space" window, either point an empty partition or lvm block device in the "Normal Disk Partition" section or slect "Simple File" and point to the file location. File would be automatically created. Click "Forward"

Note: If you have SElinux enabled in dom0, please make sure that the image is kept under /var/lib/xen/images. Selinux may prevent xend from writing to images on other locations which would endup in guest creation failure.
7 - In the "Connect to Host network" section, select either the "Virtual Network" or "Share physical device". Set fixed Mac address if desired. Click "Forward".

8 - In the "Allocate memory and cpu" page, select a minimum of 512MB of memory and vcpu = physical cpu on the host for optimum performance. Click "Forward".

9 - Review the summary screen and click "Finish".

If you are installing a x86 or x86_64 guest, a graphical vnc window will pop up starting the installation of the guest and installation of the guest can be continued normally as per the installation documentation of the OS that you are trying to install.
If you are installing an ia64 guest, the installer would drop you to an EFI shell. Below steps demonstrates how to proceed with the installation from the efi shell.
10 - Efi shell would be shown somewhat similar to the below image.

11 - On the shell, type "mount fs0" to have the DVD iso that we specified in the virt-manager mounted.

12 - Change to fs0 by typing "fs0:" and see the contents by running "dir" command.

13 - boot the installation using the bootia64.efi.

14 - Press "Enter" on the "Elilo boot:" prompt. From this point onwards, the installation of the guest would start normally.

Sunday, February 22, 2009
How to configure autofs maps in LDAP using different schemas?
Through this blog, I am explaining how to configure autofs maps in LDAP using different schemas supported by autofs in Red Hat Enterprise Linux 5. In this blog, I am not explaining details of how to configure LDAP server. It's assumed that you have an LDAP server in your environment which is already working perfectly, anonymous read access is allowed for the autofs maps and autofs clients are allowed to contact port 389 of the ldap server. Different LDAP servers provide different interfaces to manage databases. So explaining how to add the data to ldap database and how to manage them are outside the scope of this doc.
It's also assumed that every client in the network is already configured as a client of the ldap server to take user Information from the LDAP server via authconfig-tui. If no, please configure all clients as below.
Run "authconfig-tui". In the "User Information" section, select "Use LDAP" -> Next -> Type in the server name as ldap://ip-of-ldap-server-> Enter "dc=example,dc=com" as the "Base DN". Click "ok".
Currently there are three different schemas supported by autofs. I would take the below scenario as an example to explain these three schemas. This scenario includes examples for both direct mounts and indirect mounts. If you don't know what is the difference between direct and indirect mounts, please stop here, search the web and get a thorough understanding and come back.
- /direct (nfs share) from a remote server need to be auto mounted on /diret-mnt on the client whenever a user tries to access /direct-mnt.
- /isos/debian-40r7-i386-netinst.iso (kept locally on every client) should be auto mounted on /debian whenever a user tries to access /debian.
- /homedirs/$username from a remote server need to be auto mounted on /home/$username whenever a user attempts to log in to the client.
- If user x tries to access /projects/x, /projects/x from the remote system should be auto mounted.
We would configure #1 and #2 using direct mount and #3 and #4 using indirect mount. If ldap is not used, the equivalent local configuration file (/etc/auto.master and other mapped files) would look like as below.
/etc/auto.master
+auto.master
/- /etc/auto.direct
/home /etc/auto.home
/projects /etc/auto.project
/etc/auto.direct
/direct-mnt -fstype=nfs,rw ip-of-nfs-server:/direct
/debian -fstype=iso9660,ro,loop :/iso/debian-40r7-i386-netinst.iso
/etc/auto.home
* -fstype=nfs,rw ip-of-nfs-server:/homedirs/&
/etc/auto.project
x -fstype=nfs,rw ip-of-nfs-server:/projects/x
Now we are exploring how we can define all these maps in ldap server and configure the autofs in client to read the maps from ldap server instead of local files. The only thing needed locally is the below entry in /etc/auto.master which is there in all RHEL5 systems by default..
+auto.master
Schema I
The LDIF file to populate the above maps to ldap server would look like as below. The ldap suffix used in my example is dc=example,dc=com which is already defined in the ldap server.
Below is the definition of the schema for LDAPv3 servers.
attributetype ( 1.3.6.1.1.1.1.26 NAME 'nisMapName'
SUP name )
attributetype ( 1.3.6.1.1.1.1.27 NAME 'nisMapEntry'
EQUALITY caseExactIA5Match
SUBSTR caseExactIA5SubstringsMatch
SYNTAX 1.3.6.1.4.1.1466.115.121.1.26{1024} SINGLE-VALUE )
objectclass ( 1.3.6.1.1.1.2.9 NAME 'nisMap'
DESC 'A generic abstraction of a NIS map'
SUP top STRUCTURAL
MUST nisMapName
MAY description )
objectclass ( 1.3.6.1.1.1.2.10 NAME 'nisObject'
DESC 'An entry in a NIS map'
SUP top STRUCTURAL
MUST ( cn $ nisMapEntry $ nisMapName )
MAY description )
Below is the LDIF file which defines the ldap maps for autofs for the above mentioned example.
#defining auto.master
dn: nisMapName=auto.master,dc=example,dc=com
objectClass: top
objectClass: nisMap
nisMapName: auto.master
#Defining all those required for auto.direct (1 & 2)
dn: cn=/-,nisMapName=auto.master,dc=example,dc=com
objectClass: nisObject
cn: /-
nisMapName: auto.master
nisMapEntry: auto.direct
dn: nisMapName=auto.direct,dc=example,dc=com
objectClass: top
objectClass: nisMap
nisMapName: auto.direct
dn: cn=/direct-mnt,nisMapName=auto.direct,dc=example,dc=com
objectClass: nisObject
cn: /direct-mnt
nisMapName: auto.direct
nisMapEntry: -fstype=nfs,rw ip-of-nfs-server:/direct
dn: cn=/debian,nisMapName=auto.direct,dc=example,dc=com
objectClass: nisObject
cn: /debian
nisMapName: auto.direct
nisMapEntry: -fstype=iso9660,ro,loop :/iso/debian-40r7-i386-netinst.iso
#Defining all those required for auto.home (3)
dn: cn=/home,nisMapName=auto.master,dc=example,dc=com
objectClass: nisObject
cn: /home
nisMapName: auto.master
nisMapEntry: auto.home
dn: nisMapName=auto.home,dc=example,dc=com
objectClass: top
objectClass: nisMap
nisMapName: auto.home
dn: cn=/,nisMapName=auto.home,dc=example,dc=com
objectClass: nisObject
cn: /
nisMapName: auto.home
nisMapEntry: -fstype=nfs,rw ip-of-nfs-server:/homedirs/&
#Defining all those required for auto.project (4)
dn: cn=/projects,nisMapName=auto.master,dc=example,dc=com
objectClass: nisObject
cn: /projects
nisMapName: auto.master
nisMapEntry: auto.project
dn: nisMapName=auto.project,dc=example,dc=com
objectClass: top
objectClass: nisMap
nisMapName: auto.project
dn: cn=x,nisMapName=auto.project,dc=example,dc=com
objectClass: nisObject
cn: x
nisMapName: auto.project
nisMapEntry: -fstype=nfs,rw ip-of-nfs-server:/projects/x
- Populate the ldap databae with the above ldif file. Please refer the respective ldap server docs to know more on how to do that.
- On the client, edit /etc/sysconfig/autofs and uncomment the below lines.
MAP_OBJECT_CLASS="nisMap"
ENTRY_OBJECT_CLASS="nisObject"
MAP_ATTRIBUTE="nisMapName"
ENTRY_ATTRIBUTE="cn"
VALUE_ATTRIBUTE="nisMapEntry"
- Restart autofs and verify everything is working as expected.
Schema II
Below is the definition of the schema for LDAPv3 servers.
attributetype ( 1.3.6.1.1.1.1.25 NAME 'automountInformation'
DESC 'Information used by the autofs automounter'
EQUALITY caseExactIA5Match
SYNTAX 1.3.6.1.4.1.1466.115.121.1.26 SINGLE-VALUE )
objectclass ( 1.3.6.1.1.1.1.13 NAME 'automount' SUP top STRUCTURAL
DESC 'An entry in an automounter map'
MUST ( cn $ automountInformation )
MAY ( description ) )
objectclass ( 1.3.6.1.4.1.2312.4.2.2 NAME 'automountMap' SUP top STRUCTURAL
DESC 'An group of related automount objects'
MUST ( ou ) )
Below is the LDIF file which defines the ldap maps for autofs for the above mentioned example.
#Defines auto.master
dn: ou=auto.master,dc=example,dc=com
objectClass: top
objectClass: automountMap
ou: auto.master
#Defining all those required for auto.direct (1 & 2)
dn: cn=/-,ou=auto.master,dc=example,dc=com
objectClass: top
objectClass: automount
cn: /-
automountInformation: auto.direct
dn: ou=auto.direct,dc=example,dc=com
objectClass: top
objectClass: automountMap
ou: auto.direct
dn: cn=/direct-mnt,ou=auto.direct,dc=example,dc=com
objectClass: top
objectClass: automount
cn: /direct-mnt
automountInformation: -fstype=nfs,rw ip-of-nfs-server:/direct
dn: cn=/debian,ou=auto.direct,dc=example,dc=com
objectClass: top
objectClass: automount
cn: /debian
automountInformation: -fstype=iso9660,ro,loop :/iso/debian-40r7-i386-netinst.iso
#Defining all those required for auto.home (3)
dn: cn=/home,ou=auto.master,dc=example,dc=com
objectClass: top
objectClass: automount
cn: /home
automountInformation: auto.home
dn: ou=auto.home,dc=example,dc=com
objectClass: top
objectClass: automountMap
ou: auto.home
dn: cn=/,ou=auto.home,dc=example,dc=com
objectClass: top
objectClass: automount
cn: /
automountInformation: -fstype=nfs,rw ip-of-nfs-server:/homedirs/&
#Defining all those required for auto.project (4)
dn: cn=/projects,ou=auto.master,dc=example,dc=com
objectClass: top
objectClass: automount
cn: /projects
automountInformation: auto.project
dn: ou=auto.project,dc=example,dc=com
objectClass: top
objectClass: automountMap
ou: auto.project
dn: cn=x,ou=auto.project,dc=example,dc=com
objectClass: top
objectClass: automount
cn: x
automountInformation: -fstype=nfs,rw ip-of-nfs-server:/projects/x
- Populate the ldap databae with the above ldif file. Please refer the respective ldap server docs to know more on how to do that.
- On the client, edit /etc/sysconfig/autofs and uncomment the below lines.
MAP_OBJECT_CLASS="automountMap"
ENTRY_OBJECT_CLASS="automount"
MAP_ATTRIBUTE="ou"
ENTRY_ATTRIBUTE="cn"
VALUE_ATTRIBUTE="automountInformation"
- Restart autofs and verify everything is working as expected.
Schema III
Below is the definition of the schema for LDAPv3 servers.
attributetype ( 1.3.6.1.1.1.1.31 NAME 'automountMapName'
DESC 'automount Map Name'
EQUALITY caseExactIA5Match
SUBSTR caseExactIA5SubstringsMatch
SYNTAX 1.3.6.1.4.1.1466.115.121.1.26 SINGLE-VALUE )
attributetype ( 1.3.6.1.1.1.1.32 NAME 'automountKey'
DESC 'Automount Key value'
EQUALITY caseExactIA5Match
SUBSTR caseExactIA5SubstringsMatch
SYNTAX 1.3.6.1.4.1.1466.115.121.1.26 SINGLE-VALUE )
attributetype ( 1.3.6.1.1.1.1.33 NAME 'automountInformation'
DESC 'Automount information'
EQUALITY caseExactIA5Match
SUBSTR caseExactIA5SubstringsMatch
SYNTAX 1.3.6.1.4.1.1466.115.121.1.26 SINGLE-VALUE )
objectclass ( 1.3.6.1.1.1.2.16 NAME 'automountMap' SUP top STRUCTURAL
MUST ( automountMapName )
MAY description )
objectclass ( 1.3.6.1.1.1.2.17 NAME 'automount' SUP top STRUCTURAL
DESC 'Automount information'
MUST ( automountKey $ automountInformation )
MAY description )
Below is the LDIF file which defines the ldap maps for autofs for the above mentioned example.
#Defines auto.master
dn: automountMapName=auto.master,dc=example,dc=com
automountMapName: auto.master
objectClass: top
objectClass: automountMap
#Defining all those required for auto.direct (1 & 2)
dn: automountKey=/-,automountMapName=auto.master,dc=example,dc=com
objectClass: automount
automountKey: /-
automountInformation: auto.direct
dn: automountMapName=auto.direct,dc=example,dc=com
automountMapName: auto.direct
objectClass: top
objectClass: automountMap
dn: automountKey=/direct-mnt,automountMapName=auto.direct,dc=example,dc=com
automountKey: /direct-mnt
objectClass: automount
automountInformation: -fstype=nfs,rw ip-of-nfs-server:/direct
dn: automountKey=/debian,automountMapName=auto.direct,dc=example,dc=com
automountKey: /debian
objectClass: automount
automountInformation: -fstype=iso9660,ro,loop :/iso/debian-40r7-i386-netinst.iso
#Defining all those required for auto.home (3)
dn: automountKey=/home,automountMapName=auto.master,dc=example,dc=com
objectClass: automount
automountKey: /home
automountInformation: auto.home
dn: automountMapName=auto.home,dc=example,dc=com
automountMapName: auto.home
objectClass: top
objectClass: automountMap
dn: automountKey=/,automountMapName=auto.home,dc=example,dc=com
automountKey: /
objectClass: automount
automountInformation: -fstype=nfs,rw ip-of-nfs-server:/homedirs/&
#Defining all those required for auto.project (4)
dn: automountKey=/projects,automountMapName=auto.master,dc=example,dc=com
objectClass: automount
automountKey: /projects
automountInformation: auto.project
dn: automountMapName=auto.project,dc=example,dc=com
automountMapName: auto.project
objectClass: top
objectClass: automountMap
dn: automountKey=x,automountMapName=auto.project,dc=example,dc=com
automountKey: x
objectClass: automount
automountInformation: -fstype=nfs,rw ip-of-nfs-server:/projects/x
- Populate the ldap databae with the above ldif file. Please refer the respective ldap server docs to know more on how to do that.
- On the client, edit /etc/sysconfig/autofs and uncomment the below lines.
MAP_OBJECT_CLASS="automountMap"
ENTRY_OBJECT_CLASS="automount"
MAP_ATTRIBUTE="automountMapName"
ENTRY_ATTRIBUTE="automountKey"
VALUE_ATTRIBUTE="automountInformation"
- Restart autofs and verify everything is working as expected.
Note: In all maps, please replace ip-of-nfs-server with the actual IP address of the nfs server.
Tuesday, February 17, 2009
How to Configure NFSv4 with kerberos in RHEL? (Part II)
Most users of Solaris and NetApp file servers might have wondered why linux alone sticks very hard to the pseudo file system in nfsv4 and why it's not possible to mount seperate nfsv4 shares as separate mounts on the client. Technically this is possible. Below steps can be followed to achieve this. Before you read this post, it is highly recommended to read this to get a basic idea on how to configure nfsv4 with kerberos in linux.
Our requirements.
On the server we want to share /home/share, /exports/public and /projects as nfsv4 shares and they need to be mounted on the client on /share, /public and /projects respectively.
Follow the below steps on the server.
- Create /home/share, /exports/public and /project directories. Use "mkdir" to do this.
- Create an nfsv4 root directory. Let define it as "/nfs" and can be created using "mkdir /nfs",
- Create /nfs/home/share, /nfs/exports/public and /nfs/projects on the server. Use "mkdir"
- Bind mount /home/share on /nfs/home/share, /exports/public on /nfs/exports/public and /projects on /nfs/projects.
# mount --bind /home/share /nfs/home/share
# mount --bind /exports/public /nfs/exports/public
# mount --bind /projects /nfs/projects
- Define /etc/exports as below.
/nfs gss/krb5p(rw,sync,fsid=0,crossmnt)
/nfs/home/share gss/krb5p(rw,sync)
/nfs/exports/public gss/krb5p(rw,sync)
/nfs/projects gss/krb5p(rw,sync)
- Restart nfs server service and rpcidmap.
- Configure the client as I explained in my previous post referenced earlier.
- Now these share can be mounted on the client using the below commands.
mount -t nfs4 server-ip:/home/share /share -o sec=krb5p
mount -t nfs4 server-ip:/exports/public /public -o sec=krb5p
mount -t nfs4 server-ip:/projects /projects -o sec=krb5p
Looks a bit convoluted? If no, you are a diligent system administrator -:)
Thursday, February 12, 2009
How to configure nfsv4 with kerberos in RHEL?
Below is a small howto which explain how to set this up in a simple environment. Below setup involves three systems.
1 - A kerberos server.
2 - An NFS server.
3 - An NFS client.
All the above three systems are running RHEL-5.3. I am explaining what all need to be done on each server and showing an example to prove that 16 group limitation not affected with nfsv4 while using kerberos authentication. I am not including LDAP/NIS in this setup since that is optional.
Pre-requisites
- There should be a dns server in your network and an FQDN for the above three systems. All FQDNs should resolve forward and revers from all systems appropriately. This is a requirement for kerberos to work.
- Time on all the above three machines would be synced to the same NTP server and should have the same time on all the three machines. This is a requirement for kerberos to work properly.
How to setup a Kerberos server?
Below is what all I did to setup the keberos server. If you already have a kerberos server in your environment like windows AD or Solaris, you can use that system and no need to setup a new one. Please refer respective docs for more details on how to configure those kerberos servers. I am setting up RHEL5 as the kerberos using MIT kerberos.
1.1 - Install krb5-server.
# yum install krb5-server
1.2 - Choose a realm of your choice. It's generally recommended to use the dns domain name in UPPER case as the kerberos realm. My DNS domain name is pnq.redhat.com and I have selected PNQ.REDHAT.COM as the kerberos realm.
1.3 - Run "authconfig-tui". In the "Authentication" section, select "Use Kerberos" -> Next -> Type in the realm name, IP of the KDC and admin server. IP of the KDC and admin server is the ip of the same machine. Click "ok".
1.4 - Edit /var/kerberos/krb5kdc/kdc.conf and change the realm name in [realms] section to match your realm name. Eg,
[realms]
PNQ.REDHAT.COM = {
...............
...............
1.5 - Create the database using the kdb5_util utility from a shell prompt:
# /usr/kerberos/sbin/kdb5_util create -s
Please type a password on the prompt and re-enter it on the verification prompt.
1.6 - Edit the /var/kerberos/krb5kdc/kadm5.acl file and give */admin all privileges on the database. Eg,
*/admin@PNQ.REDHAT.COM *
1.7 - Run "kadmin.local" and add a principle named "root/admin" using the "addprinc" command. Set a password that you wish.
# kadmin.local
Authenticating as principal root/admin@PNQ.REDHAT.COM with password.
kadmin.local: addprinc root/admin
WARNING: no policy specified for root/admin@PNQ.REDHAT.COM; defaulting to no policy
Enter password for principal "root/admin@PNQ.REDHAT.COM":
Re-enter password for principal "root/admin@PNQ.REDHAT.COM":
Principal "root/admin@PNQ.REDHAT.COM" created.
1.8 - Start Kerberos using the following commands:
/sbin/service krb5kdc start
/sbin/service kadmin start
/sbin/service krb524 start
1.9 - Run the "kadmin" command and enter the root/admin password that you entered in 1.7 on the prompt and add a new user named "nfsuser" with a password.
# kadmin
Authenticating as principal root/admin@PNQ.REDHAT.COM with password.
Password for root/admin@PNQ.REDHAT.COM:
kadmin: addprinc nfsuser
WARNING: no policy specified for nfsuser@PNQ.REDHAT.COM; defaulting to no policy
Enter password for principal "nfsuser@PNQ.REDHAT.COM":
Re-enter password for principal "nfsuser@PNQ.REDHAT.COM":
Principal "nfsuser@PNQ.REDHAT.COM" created.
Nothing more to do on the kerberos server at this time. We would do the rest from nfsserver and client after logging into the kerberos server via “kadmin” from there whenever appropriate.
How to configure the NFS server?
2.1 - Run "authconfig-tui". In the "Authentication" section, select "Use Kerberos" -> Next -> Type in the realm name, IP of the KDC and admin server that we setup earlier. Click "ok".
2.2 - Add a user named "nfsuser" with uid 2000 without setting up any password for that user.
# useradd -u 2000 nfsuser
2.3 - Create 20 groups named "group1 - group20" with gid 3001-3020 on the system.
# for i in `seq 1 9`; do groupadd -g 300$i group$i;done
# for i in `seq 10 20`; do groupadd -g 30$i group$i;done
2.4 - Add "nfsuser" member of all these 20 groups.
# usermod -G group1,group2,group3,group4,group5,group6,group7,group8,group9,group10,group11,group12,group13,group14,group15,group16,group17,group18,group19,group20 nfsuser
2.5 - Create a directory to share using nfs.
# mkdir /nfs
Create 20 directories and each are writable by one group.
# for i in `seq 1 20`; do mkdir /nfs/group$i ;chgrp group$i /nfs/group$i; chmod g+w /nfs/group$i; done
2.6 - Edit /etc/sysconfig/nfs and uncomment the below line.
SECURE_NFS="yes"
2.7 - Edit /etc/exports and share /nfs as below.
/nfs gss/krb5p(rw,sync,fsid=0)
2.8 - Run "kadmin" and create a service principle for nfs server and extract it to a keytab file in the nfsserver. The format of the service principle is "nfs/FQDN of nfs server". Use ktadd to extract it to a keytab file.
# kadmin
Authenticating as principal root/admin@PNQ.REDHAT.COM with password.
Password for root/admin@PNQ.REDHAT.COM:
kadmin: addprinc -randkey nfs/dhcp7-135.pnq.redhat.com
WARNING: no policy specified for nfs/dhcp7-135.pnq.redhat.com@PNQ.REDHAT.COM; defaulting to no policy
Principal "nfs/dhcp7-135.pnq.redhat.com@PNQ.REDHAT.COM" created.
kadmin: ktadd -e des-cbc-crc:normal nfs/dhcp7-135.pnq.redhat.com
Entry for principal nfs/dhcp7-135.pnq.redhat.com with kvno 7, encryption type DES cbc mode with CRC-32 added to keytab WRFILE:/etc/krb5.keytab.
kadmin: quit
Note: "-e des-cbc-crc:normal or -e des-cbc-crc:md5" to the above ktadd command is required only if you are willing to use RHEL4 or RHEL5.2 and below as the clients. If clients are only RHEL5.3 and other Unix systems (like Solaris), that option can be skipped.
2.9 - Start nfs server service and rpcidmapd.
# service nfs start
# service rpcidmapd restart
How to configure the NFS client?
3.1 - Repeat step 2.1
3.2 - Repeat step 2.2
3.3 - Repeat step 2.3
3.4 - Repeat step 2.4
3.5 - Edit /etc/sysconfig/nfs and uncomment the below line.
SECURE_NFS="yes"
3.6 - Run "kadmin" and create a service principle for nfs client and extract it to a keytab file in the nfsserver. The format of the service principle is "nfs/FQDN of nfs client". Use ktadd to extract it to a keytab file.
# kadmin
Authenticating as principal root/admin@PNQ.REDHAT.COM with password.
Password for root/admin@PNQ.REDHAT.COM:
kadmin: addprinc -randkey nfs/dhcp7-143.pnq.redhat.com
WARNING: no policy specified for nfs/dhcp7-143.pnq.redhat.com@PNQ.REDHAT.COM; defaulting to no policy
Principal "nfs/dhcp7-143.pnq.redhat.com@PNQ.REDHAT.COM" created.
kadmin: ktadd nfs/dhcp7-143.pnq.redhat.com
Entry for principal nfs/dhcp7-143.pnq.redhat.com with kvno 3, encryption type Triple DES cbc mode with HMAC/sha1 added to keytab WRFILE:/etc/krb5.keytab.
Entry for principal nfs/dhcp7-143.pnq.redhat.com with kvno 3, encryption type DES cbc mode with CRC-32 added to keytab WRFILE:/etc/krb5.keytab.
kadmin: quit
3.7 - Start "rpcgssd" and "rpcidmapd".
# service rpcgssd start
# service rpcidmapd restart
3.8 - Mount the share as below.
# mount -t nfs4 fqdn of the server:/ -o sec=krb5p
Eg,
# mount -t nfs4 dhcp7-135.pnq.redhat.com:/ /mnt -o sec=krb5p
This would successfully mount the share on the client.
3.9 - Switch to user "nfsuser".
# su - nfsuser
- Run "df -h /mnt" and try to cd /mnt. This would fail because "nfsuser" requires a ticket to access the mount point. The "df" command wouldn't show the size of the filesystem, but it would show a "-" at this point.
# df -h /mnt
dhcp7-135.pnq.redhat.com:/
- - - - /mnt
- Get a ticket for "nfsuser".
# kinit
Enter the kerberos password for "nfsuser."
# df -h /mnt
dhcp7-135.pnq.redhat.com:/
7.2G 2.0G 4.9G 29% /mnt
- "nfsuser" is member of "group1 - group20". Direcotry /mnt/group1 is writable by "group1" (first group) whereas /mnt/group20 is writable by "group20" (20th group). "nfsuser" would be able to write to both these directories on the client. Verify it by writing something to that directory as "nfsuser".
Note: If you are seeing any problems, please re-confirm that you have met the pre-requisites successfully without any problems.
It's highly recommended to use LDAP/NIS to store the user and group information and configure both nfs server and client to do name lookup on the LDAP/NIS server rather than configuring them on earch client's local files. How to configure LDAP/NIS is outside the scope of this write up.
What are the advantages of NFV4 over NFCv3?
1 – NFSv4 with kerberos supports authentication. A big disadvantage of nfsv3 was that root user can “su –”, get the remote user's home directory automounted and delete/modify his files. This is a big security risk in bigger enterprises if they have 1000s of systems. In the above example, this problem is solved. If root on a system do “su - ” and can get his home directory automouted, he can't delete or modify the files without getting a ticket from the kerberos server. To get a ticket, he must pass 's password.
2 – NFSv4 with kerberos supports encryption. While using krb5p, every communication between client and server is sent over the wire after it was encrypted which was not supported by NFSv3.
3 – 16 group limitation is raised. If you don't know more about this, please refer Eisler's nfs blog here
In the above example, I have proved that there is no such limitation in nfsv4.
There are more......................
1 - A kerberos server.
2 - An NFS server.
3 - An NFS client.
All the above three systems are running RHEL-5.3. I am explaining what all need to be done on each server and showing an example to prove that 16 group limitation not affected with nfsv4 while using kerberos authentication. I am not including LDAP/NIS in this setup since that is optional.
Pre-requisites
- There should be a dns server in your network and an FQDN for the above three systems. All FQDNs should resolve forward and revers from all systems appropriately. This is a requirement for kerberos to work.
- Time on all the above three machines would be synced to the same NTP server and should have the same time on all the three machines. This is a requirement for kerberos to work properly.
How to setup a Kerberos server?
Below is what all I did to setup the keberos server. If you already have a kerberos server in your environment like windows AD or Solaris, you can use that system and no need to setup a new one. Please refer respective docs for more details on how to configure those kerberos servers. I am setting up RHEL5 as the kerberos using MIT kerberos.
1.1 - Install krb5-server.
# yum install krb5-server
1.2 - Choose a realm of your choice. It's generally recommended to use the dns domain name in UPPER case as the kerberos realm. My DNS domain name is pnq.redhat.com and I have selected PNQ.REDHAT.COM as the kerberos realm.
1.3 - Run "authconfig-tui". In the "Authentication" section, select "Use Kerberos" -> Next -> Type in the realm name, IP of the KDC and admin server. IP of the KDC and admin server is the ip of the same machine. Click "ok".
1.4 - Edit /var/kerberos/krb5kdc/kdc.conf and change the realm name in [realms] section to match your realm name. Eg,
[realms]
PNQ.REDHAT.COM = {
...............
...............
1.5 - Create the database using the kdb5_util utility from a shell prompt:
# /usr/kerberos/sbin/kdb5_util create -s
Please type a password on the prompt and re-enter it on the verification prompt.
1.6 - Edit the /var/kerberos/krb5kdc/kadm5.acl file and give */admin all privileges on the database. Eg,
*/admin@PNQ.REDHAT.COM *
1.7 - Run "kadmin.local" and add a principle named "root/admin" using the "addprinc" command. Set a password that you wish.
# kadmin.local
Authenticating as principal root/admin@PNQ.REDHAT.COM with password.
kadmin.local: addprinc root/admin
WARNING: no policy specified for root/admin@PNQ.REDHAT.COM; defaulting to no policy
Enter password for principal "root/admin@PNQ.REDHAT.COM":
Re-enter password for principal "root/admin@PNQ.REDHAT.COM":
Principal "root/admin@PNQ.REDHAT.COM" created.
1.8 - Start Kerberos using the following commands:
/sbin/service krb5kdc start
/sbin/service kadmin start
/sbin/service krb524 start
1.9 - Run the "kadmin" command and enter the root/admin password that you entered in 1.7 on the prompt and add a new user named "nfsuser" with a password.
# kadmin
Authenticating as principal root/admin@PNQ.REDHAT.COM with password.
Password for root/admin@PNQ.REDHAT.COM:
kadmin: addprinc nfsuser
WARNING: no policy specified for nfsuser@PNQ.REDHAT.COM; defaulting to no policy
Enter password for principal "nfsuser@PNQ.REDHAT.COM":
Re-enter password for principal "nfsuser@PNQ.REDHAT.COM":
Principal "nfsuser@PNQ.REDHAT.COM" created.
Nothing more to do on the kerberos server at this time. We would do the rest from nfsserver and client after logging into the kerberos server via “kadmin” from there whenever appropriate.
How to configure the NFS server?
2.1 - Run "authconfig-tui". In the "Authentication" section, select "Use Kerberos" -> Next -> Type in the realm name, IP of the KDC and admin server that we setup earlier. Click "ok".
2.2 - Add a user named "nfsuser" with uid 2000 without setting up any password for that user.
# useradd -u 2000 nfsuser
2.3 - Create 20 groups named "group1 - group20" with gid 3001-3020 on the system.
# for i in `seq 1 9`; do groupadd -g 300$i group$i;done
# for i in `seq 10 20`; do groupadd -g 30$i group$i;done
2.4 - Add "nfsuser" member of all these 20 groups.
# usermod -G group1,group2,group3,group4,group5,group6,group7,group8,group9,group10,group11,group12,group13,group14,group15,group16,group17,group18,group19,group20 nfsuser
2.5 - Create a directory to share using nfs.
# mkdir /nfs
Create 20 directories and each are writable by one group.
# for i in `seq 1 20`; do mkdir /nfs/group$i ;chgrp group$i /nfs/group$i; chmod g+w /nfs/group$i; done
2.6 - Edit /etc/sysconfig/nfs and uncomment the below line.
SECURE_NFS="yes"
2.7 - Edit /etc/exports and share /nfs as below.
/nfs gss/krb5p(rw,sync,fsid=0)
2.8 - Run "kadmin" and create a service principle for nfs server and extract it to a keytab file in the nfsserver. The format of the service principle is "nfs/FQDN of nfs server". Use ktadd to extract it to a keytab file.
# kadmin
Authenticating as principal root/admin@PNQ.REDHAT.COM with password.
Password for root/admin@PNQ.REDHAT.COM:
kadmin: addprinc -randkey nfs/dhcp7-135.pnq.redhat.com
WARNING: no policy specified for nfs/dhcp7-135.pnq.redhat.com@PNQ.REDHAT.COM; defaulting to no policy
Principal "nfs/dhcp7-135.pnq.redhat.com@PNQ.REDHAT.COM" created.
kadmin: ktadd -e des-cbc-crc:normal nfs/dhcp7-135.pnq.redhat.com
Entry for principal nfs/dhcp7-135.pnq.redhat.com with kvno 7, encryption type DES cbc mode with CRC-32 added to keytab WRFILE:/etc/krb5.keytab.
kadmin: quit
Note: "-e des-cbc-crc:normal or -e des-cbc-crc:md5" to the above ktadd command is required only if you are willing to use RHEL4 or RHEL5.2 and below as the clients. If clients are only RHEL5.3 and other Unix systems (like Solaris), that option can be skipped.
2.9 - Start nfs server service and rpcidmapd.
# service nfs start
# service rpcidmapd restart
How to configure the NFS client?
3.1 - Repeat step 2.1
3.2 - Repeat step 2.2
3.3 - Repeat step 2.3
3.4 - Repeat step 2.4
3.5 - Edit /etc/sysconfig/nfs and uncomment the below line.
SECURE_NFS="yes"
3.6 - Run "kadmin" and create a service principle for nfs client and extract it to a keytab file in the nfsserver. The format of the service principle is "nfs/FQDN of nfs client". Use ktadd to extract it to a keytab file.
# kadmin
Authenticating as principal root/admin@PNQ.REDHAT.COM with password.
Password for root/admin@PNQ.REDHAT.COM:
kadmin: addprinc -randkey nfs/dhcp7-143.pnq.redhat.com
WARNING: no policy specified for nfs/dhcp7-143.pnq.redhat.com@PNQ.REDHAT.COM; defaulting to no policy
Principal "nfs/dhcp7-143.pnq.redhat.com@PNQ.REDHAT.COM" created.
kadmin: ktadd nfs/dhcp7-143.pnq.redhat.com
Entry for principal nfs/dhcp7-143.pnq.redhat.com with kvno 3, encryption type Triple DES cbc mode with HMAC/sha1 added to keytab WRFILE:/etc/krb5.keytab.
Entry for principal nfs/dhcp7-143.pnq.redhat.com with kvno 3, encryption type DES cbc mode with CRC-32 added to keytab WRFILE:/etc/krb5.keytab.
kadmin: quit
3.7 - Start "rpcgssd" and "rpcidmapd".
# service rpcgssd start
# service rpcidmapd restart
3.8 - Mount the share as below.
# mount -t nfs4 fqdn of the server
Eg,
# mount -t nfs4 dhcp7-135.pnq.redhat.com:/ /mnt -o sec=krb5p
This would successfully mount the share on the client.
3.9 - Switch to user "nfsuser".
# su - nfsuser
- Run "df -h /mnt" and try to cd /mnt. This would fail because "nfsuser" requires a ticket to access the mount point. The "df" command wouldn't show the size of the filesystem, but it would show a "-" at this point.
# df -h /mnt
dhcp7-135.pnq.redhat.com:/
- - - - /mnt
- Get a ticket for "nfsuser".
# kinit
Enter the kerberos password for "nfsuser."
# df -h /mnt
dhcp7-135.pnq.redhat.com:/
7.2G 2.0G 4.9G 29% /mnt
- "nfsuser" is member of "group1 - group20". Direcotry /mnt/group1 is writable by "group1" (first group) whereas /mnt/group20 is writable by "group20" (20th group). "nfsuser" would be able to write to both these directories on the client. Verify it by writing something to that directory as "nfsuser".
Note: If you are seeing any problems, please re-confirm that you have met the pre-requisites successfully without any problems.
It's highly recommended to use LDAP/NIS to store the user and group information and configure both nfs server and client to do name lookup on the LDAP/NIS server rather than configuring them on earch client's local files. How to configure LDAP/NIS is outside the scope of this write up.
What are the advantages of NFV4 over NFCv3?
1 – NFSv4 with kerberos supports authentication. A big disadvantage of nfsv3 was that root user can “su –
2 – NFSv4 with kerberos supports encryption. While using krb5p, every communication between client and server is sent over the wire after it was encrypted which was not supported by NFSv3.
3 – 16 group limitation is raised. If you don't know more about this, please refer Eisler's nfs blog here
In the above example, I have proved that there is no such limitation in nfsv4.
There are more......................
Wednesday, February 11, 2009
How to add static route through a virtual (alias) interface in RHEL5?
I have two ips assigned to to my eth0. One for eth0 and the other for eth0:1 and both ips are from the same network.
eth0 Link encap:Ethernet HWaddr 00:16:3E:74:30:8B
inet addr:10.65.7.160 Bcast:10.65.7.255 Mask:255.255.254.0
eth0:1 Link encap:Ethernet HWaddr 00:16:3E:74:30:8B
inet addr:10.65.6.10 Bcast:10.65.7.255 Mask:255.255.254.0
The entries added by default in routing table would be as below.
10.65.6.0/23 dev eth0 proto kernel scope link src 10.65.7.160
169.254.0.0/16 dev eth0 scope link
default via 10.65.7.254 dev eth0
The default route means that the ip address of eth0:1 is not used as source address while contacting any machines in the network from this machine. Now I want all outgoing connetions to a specific machine in the network to be initiated with the source address of eth0:1. How this can be achieved?
1 - Using the "route" command. (This configuration is not persistent on reboot)
# route add -hostdestination-ip dev eth0:1
Eg,
# route add -host 10.65.6.1 dev eth0:1
After running the above command, all connections to 10.65.6.1 should have the source address of eth0:1
2 - Through /etc/sysconfig/network-scripts/route-eth0:1 (This would be persistent on reboots). The tricky part comes in this configuration. Most people would add a line as below to this file which wouldn't give the expcted output.
destination-ip/32 dev eth0:1
Eg,
10.65.6.1/32 dev eth0:1
The above line would add a routing to 10.65.6.1 via eth0:1, but the source ip address used would be the ip of eth0, not eth0:1. This can be verified by running "ip route show" and netstat.
/etc/sysconfig/network-scripts/route-eth0:1 should have the below entry in it to use eth0:1's ip as source ip while contacting 10.65.6.1.
destination-ip/32 dev eth0:1 src source-ip
Eg,
10.65.6.1/32 dev eth0:1 src 10.65.6.10
How to verify this is working as expected?
From the system do "telnet 10.65.6.1 80" and check the output of "netstat -nalp | grep 80" on both source and destination machine. It should show the ip of eth0:1 as the source address.
eth0 Link encap:Ethernet HWaddr 00:16:3E:74:30:8B
inet addr:10.65.7.160 Bcast:10.65.7.255 Mask:255.255.254.0
eth0:1 Link encap:Ethernet HWaddr 00:16:3E:74:30:8B
inet addr:10.65.6.10 Bcast:10.65.7.255 Mask:255.255.254.0
The entries added by default in routing table would be as below.
10.65.6.0/23 dev eth0 proto kernel scope link src 10.65.7.160
169.254.0.0/16 dev eth0 scope link
default via 10.65.7.254 dev eth0
The default route means that the ip address of eth0:1 is not used as source address while contacting any machines in the network from this machine. Now I want all outgoing connetions to a specific machine in the network to be initiated with the source address of eth0:1. How this can be achieved?
1 - Using the "route" command. (This configuration is not persistent on reboot)
# route add -host
Eg,
# route add -host 10.65.6.1 dev eth0:1
After running the above command, all connections to 10.65.6.1 should have the source address of eth0:1
2 - Through /etc/sysconfig/network-scripts/route-eth0:1 (This would be persistent on reboots). The tricky part comes in this configuration. Most people would add a line as below to this file which wouldn't give the expcted output.
Eg,
10.65.6.1/32 dev eth0:1
The above line would add a routing to 10.65.6.1 via eth0:1, but the source ip address used would be the ip of eth0, not eth0:1. This can be verified by running "ip route show" and netstat.
/etc/sysconfig/network-scripts/route-eth0:1 should have the below entry in it to use eth0:1's ip as source ip while contacting 10.65.6.1.
Eg,
10.65.6.1/32 dev eth0:1 src 10.65.6.10
How to verify this is working as expected?
From the system do "telnet 10.65.6.1 80" and check the output of "netstat -nalp | grep 80" on both source and destination machine. It should show the ip of eth0:1 as the source address.
Tuesday, February 10, 2009
How to patch and recompile a source rpm ?
Let me explain this through an example. The source rpm that I have in my Laptop while writing this is for pam_krb5. So I am taking this as an example. The base system which is used to do this is an RHEL5 system.
- Make sure that rpm-build package is installed on the system.
# yum install rpm-build
- Install the source rpm.
# rpm -ivh pam_krb5-2.2.14-1.el5_2.1.src.rpm
- Change to /usr/src/redhat/SPECS direcotry.
# cd /usr/src/redhat/SPECS/
- Just prepare the source for compilation by unpacking the source and applying the patches already defined.
# rpmbuild -bp pam_krb5.spec
Note: It's highly likely that the above command could fail with missing dependency errors which are required to compile the package. Just installing the recommended packages in the output and re-running the above command after that would be fine to run the above command without any errors.
- Move to /usr/src/redhat/BUILD directory. We can see the source unpacked in that directory.
# ls
pam_krb5-2.2.14-1
- Take a backup of the entire unpacked source which is required to generate the patch.
# cp -r pam_krb5-2.2.14-1/ pam_krb5-2.2.14-1.orig
Now the modification that I need to make to the source is to change the warining message given in pam_krb5-2.2.14-1/src/sly.c line no 168 from
warn("won't refresh credentials while running under sudo");
To
warn("Sir, couldn't refresh credentials while running under sudo");
- Simply Edit the file using your favorite editor and make the above change in the pam_krb5-2.2.14-1/src/sly.c and save the file.
- Now change the directory to /usr/src/redhat/BUILD directory using "cd" command and generate a patch using the diff command and save the patch in /usr/src/redhat/SOURCES. Name the file just like other patches for pam_krb5 are named in the SOURCES directory.
[root@localhost BUILD]# diff -Naur pam_krb5-2.2.14-1.orig/ pam_krb5-2.2.14-1 > ../SOURCES/pam_krb5-2.2.14-warning.patch
- The content of the pam_krb5-2.2.14-warning.patch would be as below.
diff -Naur pam_krb5-2.2.14-1.orig/src/sly.c pam_krb5-2.2.14-1/src/sly.c
--- pam_krb5-2.2.14-1.orig/src/sly.c 2009-02-11 11:07:36.000000000 +0530
+++ pam_krb5-2.2.14-1/src/sly.c 2009-02-11 11:11:16.000000000 +0530
@@ -165,7 +165,7 @@
/* nothing: everything's okay */
break;
case 1:
- warn("won't refresh credentials while running under sudo");
+ warn("Sir, Couldn't refresh credentials while running under sudo");
return PAM_SERVICE_ERR;
break;
case 2:
- Now come back to /usr/src/redhat/SPECS directory and start editing the spec file. My spec file is named pam_krb5.spec. Make the below changes to apply the patch while compiling the rpm.
* Increment the Release number. It was as below in my spec file.
Release: 1%{?dist}.1
I changed it to
Release: 1%{?dist}.2
* Define your patch as the last patch in the "Patchx" section. I defined it as below.
Patch1 pam_krb5-2.2.14-warning.patch
* In the %prep section, come to the last of %patchx and add your patch as the last patch. I added the below line.
%patch1 -p1 -b .warning
* In the %changelog section, document this change as the first entry. I made the below change.
* Wed Feb 11 2009 Blah Blah - 2.2.14-1%{?dist}.2
- Change the warning message when trying to refresh while running under sudo (bz #xxxx)
- Now we are all set to start recompiling the rpm. Below command can be used to recompile an rpm.
# rpmbuild -ba pam_krb5.spec
Watch that the patch is applied cleanly. I can see the below message which clearly says that the patch has been applied cleanly.
+ echo 'Patch #1 (pam_krb5-2.2.14-warning.patch):'
Patch #1 (pam_krb5-2.2.14-warning.patch):
+ patch -p1 -b --suffix .warning -s
- Once the compilation process is complete, we can see the new rpm in /usr/src/redhat/RPMS/$arch/.
- Make sure that rpm-build package is installed on the system.
# yum install rpm-build
- Install the source rpm.
# rpm -ivh pam_krb5-2.2.14-1.el5_2.1.src.rpm
- Change to /usr/src/redhat/SPECS direcotry.
# cd /usr/src/redhat/SPECS/
- Just prepare the source for compilation by unpacking the source and applying the patches already defined.
# rpmbuild -bp pam_krb5.spec
Note: It's highly likely that the above command could fail with missing dependency errors which are required to compile the package. Just installing the recommended packages in the output and re-running the above command after that would be fine to run the above command without any errors.
- Move to /usr/src/redhat/BUILD directory. We can see the source unpacked in that directory.
# ls
pam_krb5-2.2.14-1
- Take a backup of the entire unpacked source which is required to generate the patch.
# cp -r pam_krb5-2.2.14-1/ pam_krb5-2.2.14-1.orig
Now the modification that I need to make to the source is to change the warining message given in pam_krb5-2.2.14-1/src/sly.c line no 168 from
warn("won't refresh credentials while running under sudo");
To
warn("Sir, couldn't refresh credentials while running under sudo");
- Simply Edit the file using your favorite editor and make the above change in the pam_krb5-2.2.14-1/src/sly.c and save the file.
- Now change the directory to /usr/src/redhat/BUILD directory using "cd" command and generate a patch using the diff command and save the patch in /usr/src/redhat/SOURCES. Name the file just like other patches for pam_krb5 are named in the SOURCES directory.
[root@localhost BUILD]# diff -Naur pam_krb5-2.2.14-1.orig/ pam_krb5-2.2.14-1 > ../SOURCES/pam_krb5-2.2.14-warning.patch
- The content of the pam_krb5-2.2.14-warning.patch would be as below.
diff -Naur pam_krb5-2.2.14-1.orig/src/sly.c pam_krb5-2.2.14-1/src/sly.c
--- pam_krb5-2.2.14-1.orig/src/sly.c 2009-02-11 11:07:36.000000000 +0530
+++ pam_krb5-2.2.14-1/src/sly.c 2009-02-11 11:11:16.000000000 +0530
@@ -165,7 +165,7 @@
/* nothing: everything's okay */
break;
case 1:
- warn("won't refresh credentials while running under sudo");
+ warn("Sir, Couldn't refresh credentials while running under sudo");
return PAM_SERVICE_ERR;
break;
case 2:
- Now come back to /usr/src/redhat/SPECS directory and start editing the spec file. My spec file is named pam_krb5.spec. Make the below changes to apply the patch while compiling the rpm.
* Increment the Release number. It was as below in my spec file.
Release: 1%{?dist}.1
I changed it to
Release: 1%{?dist}.2
* Define your patch as the last patch in the "Patchx" section. I defined it as below.
Patch1 pam_krb5-2.2.14-warning.patch
* In the %prep section, come to the last of %patchx and add your patch as the last patch. I added the below line.
%patch1 -p1 -b .warning
* In the %changelog section, document this change as the first entry. I made the below change.
* Wed Feb 11 2009 Blah Blah
- Change the warning message when trying to refresh while running under sudo (bz #xxxx)
- Now we are all set to start recompiling the rpm. Below command can be used to recompile an rpm.
# rpmbuild -ba pam_krb5.spec
Watch that the patch is applied cleanly. I can see the below message which clearly says that the patch has been applied cleanly.
+ echo 'Patch #1 (pam_krb5-2.2.14-warning.patch):'
Patch #1 (pam_krb5-2.2.14-warning.patch):
+ patch -p1 -b --suffix .warning -s
- Once the compilation process is complete, we can see the new rpm in /usr/src/redhat/RPMS/$arch/.
How to configure kdump with xen in RHEL5?
Most poeple get confused when it comes to configuring kdump for dom0. Since there are two entries in grub.conf, one representing the hypervisor and the other representing the dom0 kernel, the confusion is while thinking where should one give the "crashkernel" parameter. Have seen some people who are not ready to do trial and error passing the "crashkernel" parameter to both hypervisor and kernel. If you are too lazy to do a trial and error, this blog may help you.
The crashkernel parameter need to be passed to the hypervisor.
Eg, (Taken from my test system)
title Red Hat Enterprise Linux Server (2.6.18-92.1.18.el5xen)
root (hd0,0)
kernel /xen.gz-2.6.18-92.1.18.el5 crashkernel=128M@16M
module /vmlinuz-2.6.18-92.1.18.el5xen ro root=/dev/VolGroup00/LogVol00 rhgb quiet
module /initrd-2.6.18-92.1.18.el5xen.img
- Configure /etc/kdump.conf appropriately. The file is self descriptive.
- Run "service kdump propagate"
- Run "service kdump start"
Subscribe to:
Posts (Atom)